
Let It Flow: How to Install a Frost-Free Water Hydrant
Running water from an outside tap can save time. Following these simple steps to install a frost-free water hydrant will also save you money and effort.
By Oscar H. Will III | Illustration by Ray E. Watkins Jr.
↓ Scroll down for web-exclusive tips. ↓
Whether you’re washing a tractor, watering a new patch of garden or filling a stock tank, getting water closer to where it’s needed is a huge help. Surprisingly, installing a new spigot, even one that’s protected from the elements, is fairly easy—especially when compared to dragging a couple hundred feet of garden hose to wherever duty calls.
The process is relatively simple and requires only a few tools and materials, including a hydrant with a standpipe sufficiently long to place the valve below the frost line; some pea rock or ½-inch screened crushed rock; some hand tools; and ideally, a backhoe fitted on your compact tractor.
Determining Location
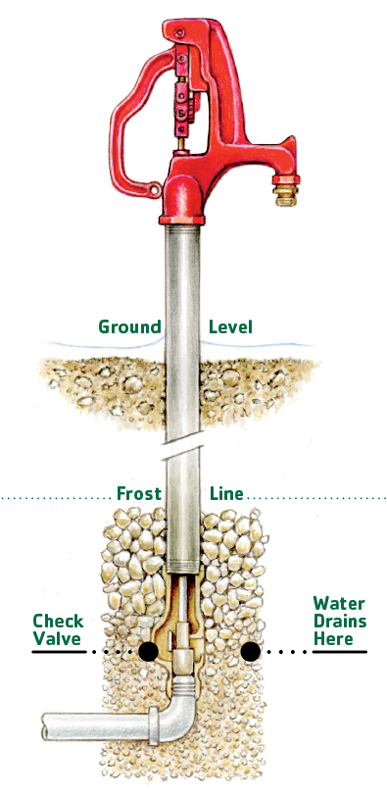
Frost-free hydrant
The first step is to decide where you want the hydrant. Be sure to situate it where it will be convenient for a number of purposes and unlikely to get hit by a vehicle, such as a snowplow, tractor or truck. Ideally you want to place it next to the south-facing wall of a building where it can benefit the most from available sunshine. Then, too, you’ll want to protect it from large stock; so, if possible, it’s best to situate the hydrant on the outside of the pasture or corral.
Next, locate an existing water line that you can tap into. If you don’t have an outdoor line yet, you will want to tap into the cold water system inside your house or shop, and then exit the basement or crawlspace below the frost line. (Because factors such as climate, soil consistency and whether the latter has been disturbed can affect the depth of the frost line, check with local officials on how to calculate the necessary depth.)
Once you have mapped out your ideal routing for the new water line, call 811 and have your place flagged for existing utilities that may be buried in the path of your new line. If applicable, also check your septic system map for buried sewer lines. Consider carefully whether there are any other underground hazards before you begin digging.
Digging
Using a backhoe or trencher, create a trench that is safely below the frost line from the supply to the intended location of your hydrant. Dig out a pit at the hydrant end that is roughly 3 feet in diameter and about a foot deeper than the level of the trench. Fill that bottom foot with pea rock or crushed stone to act as a small French drain.
Lay out your feed line—3/4-inch-diameter PEX rated for direct bury works well and is inexpensive. Connect the line to the source with a suitable ball valve so the outdoor line can be shut off independent of the rest of your system. If the supply tap is outdoors, you may need to locate the valve and install an outdoor valve box so you can access the valve and the joint easily in the future.
Attach the hydrant end of the supply line to a check valve that will prevent any water in the hydrant from working back into the system (some hydrants have integral check valves), then attach a 90-degree elbow to the inlet on the bottom of the hydrant and tighten things up.
Go ahead and pressurize the line now to see that there are no leaks. Next, prop the hydrant upright, open it, then close it and watch to be sure that water flows from the drain hole once you shut it off. The drain, located near the bottom of the hydrant, is a crucial component for keeping the hydrant from freezing.
Finishing Touches
Once you are satisfied there are no leaks and the drain is functioning properly, go ahead and set the hydrant vertically, and backfill with enough crushed rock or pea rock to cover the drain hole by several inches. Many folks run a steel or wooden post along the hydrant to offer additional support.
Now it’s time to backfill the excavation; a loader and box blade or angled grader blade make short work of it. Push all the soil back onto the trench—it will be mounded initially but should settle to roughly level. Seed it and in a few months the only reminder of the earthwork will be the convenience of running water out where you need it.
Web Exclusive: Location
When placing your hydrant you want to think about traffic patterns for sure, but you also want to think about protection from the weather. If you can install the hydrant in an area that faces south and is protected from the wind, it will be much less likely to freeze.
Web Exclusive: Run That Water
If you operate the hydrant in extremely cold conditions, run several gallons more than you might actually need to sufficiently warm the stand pipe so that the water will have time to drain before freezing. It may seem counterintuitive, but 50-degree Fahrenheit water is hot compared with -20 degree Fahrenheit galvanized pipe. So, the warmer you get that pipe, the better the chance the water will drain problem free.
Web Exclusive: Remove the Hose
Get in the habit of removing any hose that you might attach to the delivery spout on your hydrant. A length of hose will slow, and in some cases prevent, the standpipe from completely draining, and if the hydrant head and pipe freeze solid, there’s a good chance that parts will be destroyed.
Even during the warm season, it’s prudent to disconnect hoses after use to help prevent any chance of contaminating your water system. Believe it or not, if you plunk the end of the hose in the stock tank, then just shut off the hydrant when the tank is full, the hydrant, as it drains, may well siphon water from the tank into the French drain system you installed below ground. This wastes water and sets you up for a greater chance of freezing come winter.

